How to Organize Project Documentation in Docmost
Give each project its own space, keep reusable pages in a shared one, and use labels and templates so your team can find everything.

TL;DR
- Create dedicated Docmost spaces for individual projects and manage their members and permissions separately.
- Organise project information using nested pages and sub-pages.
- Use the Move and Copy to space actions to transfer or reuse documentation across spaces.
- Apply labels to group related pages and find them through Docmost Search.
- Standardise recurring documents with page templates or a reusable starter space.
- Use page history and space exports to preserve project documentation.
Docmost helps you keep project documentation organised with separate spaces for each project. Each space has its own pages, members and permissions, so teams can manage project information without mixing everything up.
You can create a space for each project, use the same page structure across them and keep shared resources like templates, guides and SOPs in a separate space.
This way, team members know where to find what they need, whether they're working on two projects or twenty.
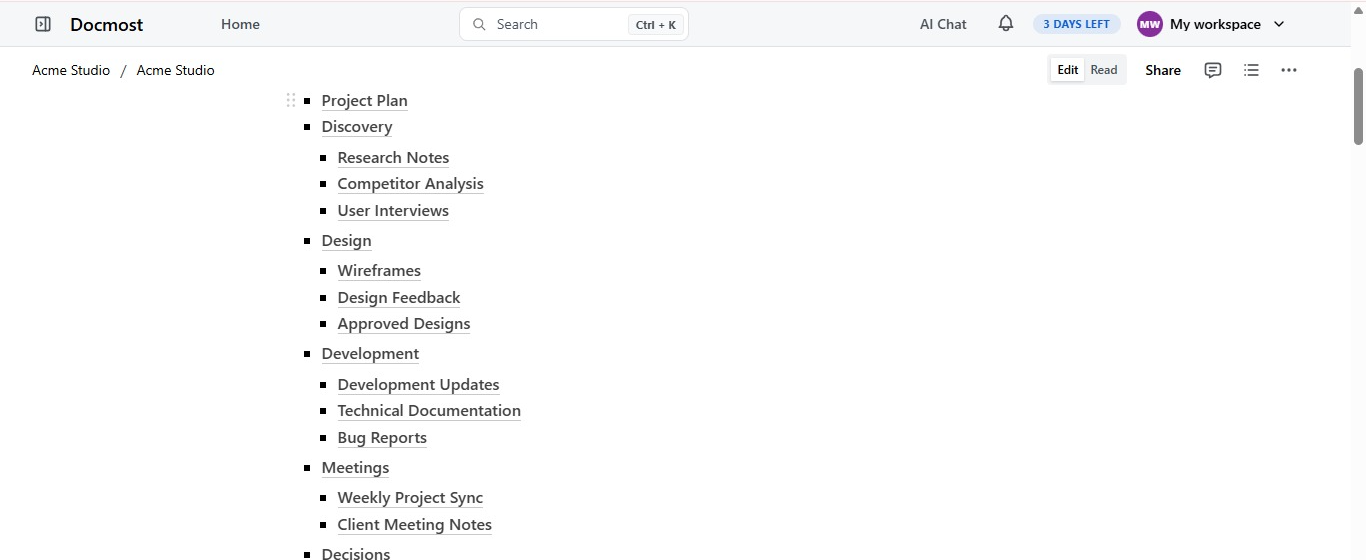
Teams usually organize project documentation in one of three ways, and each works well in the right setting and causes trouble when it is stretched too far.
The table below shows where each one fits, and the sections after it explain how to choose and how to build the result in Docmost.
|
Approach |
How it works in Docmost |
Best for |
|---|---|---|
|
By project |
Create a separate space for each project and organise its documentation using pages and sub-pages. |
Teams managing several projects with different members. |
|
By phase |
Create top-level pages such as Discovery, Build and Launch within a project space. |
Long-running projects with distinct stages. |
|
By document type |
Organise pages around categories such as Decisions, Meetings and How-tos within a project or shared space. |
Smaller projects or teams managing shared reference material. |
Docmost spaces help you keep projects separate, while pages and sub-pages keep everything organised within each project. You can also mix things up based on how your team works. For example, create a space for each project and organise its pages by phase or document type.
Sort Your Pages by How Long They Stay Useful
Before choosing how to organise your documentation, split your project pages into two groups: working pages and reference pages.
Working pages are documents your team uses regularly while a project is running, such as meeting notes, weekly updates and sprint plans. These are mostly useful during the project.
Reference pages contain information people may need long after a project ends. Examples include decisions, requirements, how-to guides and lessons learned.
In Docmost, you can keep working pages in their respective project spaces and store reusable reference documents in a shared space.
For example, weekly meeting notes can stay in the project space, while a guide on requesting system access can live in a shared space for everyone to use.
If another team needs an existing document, you can use Move or Copy to space to make it available in their space. This saves you from recreating the same documentation for every project.
How to Build the Structure in Docmost
In Docmost, a space is a separate area of your wiki that keeps a set of pages, the permissions for them, and the people who use them together, which makes it a natural fit for one project.
1. Create One Space for Each Project
Go to the Sidebar, click on Spaces, select Create Space, and give the space a clear name and slug. Once created, you can add the people working on the project and organise its documentation using pages and sub-pages.
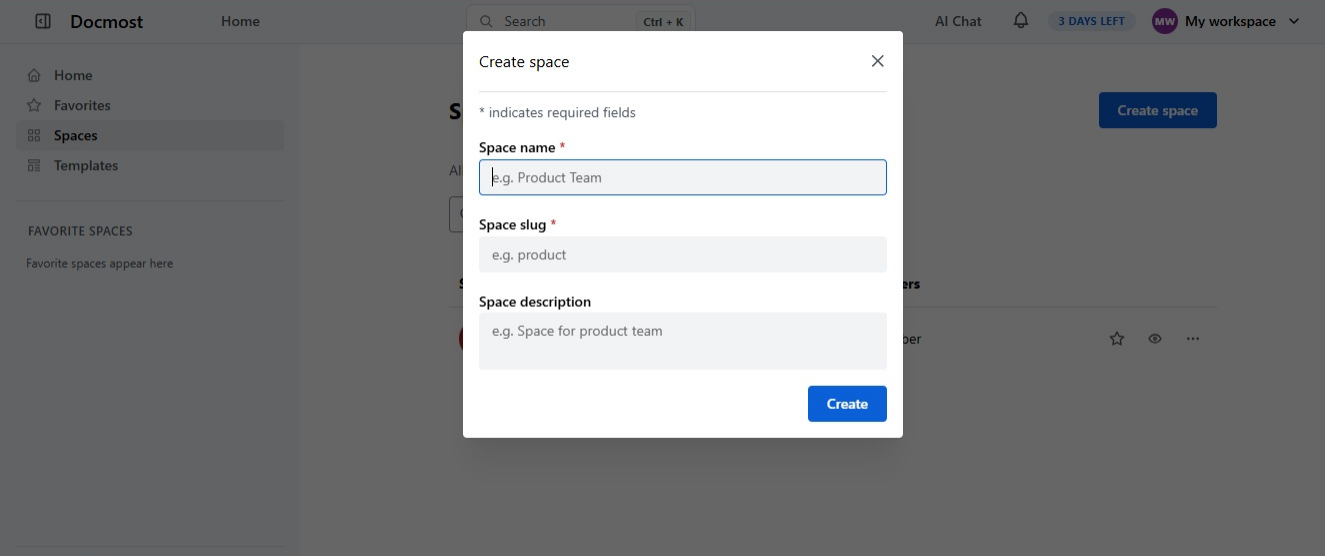
Each space has its own membership and permission settings, so you can manage who can access or edit project documentation independently of other spaces in your workspace.
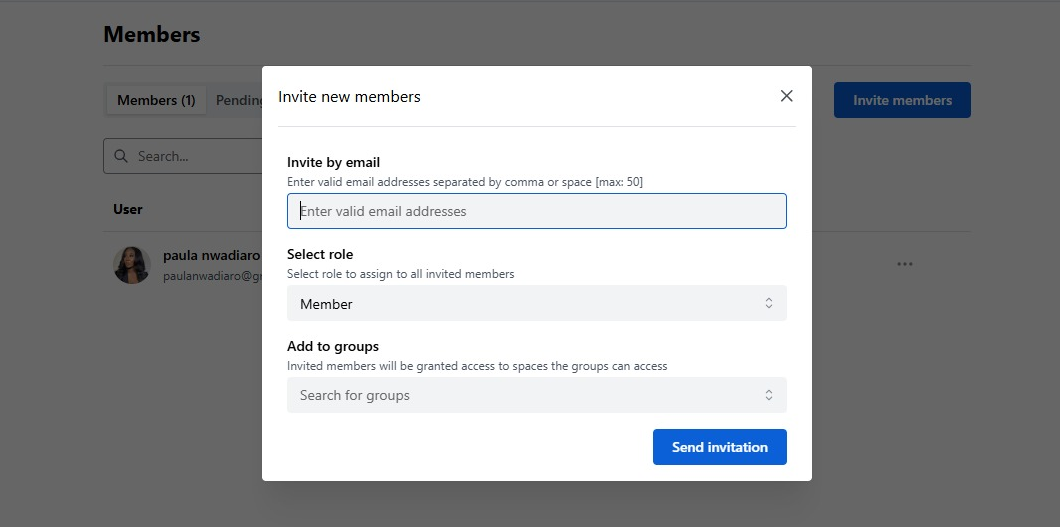
For a full walkthrough of creating a project space and its first pages, see this guide on how to set up a project wiki for your team.
2. Create a Shared Space for Reusable Pages
Create a separate space for documentation used across multiple projects. You could call it Project Standards and use it to store things like SOPs, onboarding guides, project templates and documentation guidelines.
You can also manage access to this space separately from your project spaces. For example, give team members the Viewer role so they can access the documents, while allowing only admins or documentation owners to edit them.
This keeps shared resources in one place, so you don't have to create and update the same documents across different project spaces.
3. Use the Same Top-Level Pages in Every Project Space
Docmost uses pages and sub-pages to keep information organised within each space. You can use the same structure across all your project spaces so team members don't have to figure out where things are every time.
Start with a few main pages, such as Overview, Decisions, Meetings, How-tos and Resources. Then use this same structure for each project, making it easier for everyone to find what they need.For what to write on a decisions page, see this guide on how to document product decisions.
For a website redesign, the sidebar would look like this:
Website Redesign (space)
├── Overview
├── Decisions
│ └── Decision: Move launch to March
├── Meetings
│ └── Meeting: Weekly sync 2026-11-04
├── How-tos
│ └── How to: Deploy the staging site
└── Resources
Project Standards (shared space)
├── How-tos
│ └── How to: Request staging access
├── Templates
│ └── Decision Entry Template
└── Lessons Learned
Each top-level page has one job. Overview contains the goal, scope, people involved, and key dates.
Decisions gets one page per decision, with the context and the outcome. Meetings holds notes and action items. How-tos covers steps that are specific to this project, and Resources collects links, files, and reference material. In Docmost, a page with sub-pages does the job of a folder, so Meetings can hold every set of meeting notes.
4. Keep the Page Tree to About Three Levels
The page tree is the list of pages and sub-pages in the sidebar, and each step down is one level. A path like Website redesign (the space), then Meetings, then Weekly team sync is three levels, and a fourth level is usually where people lose track of where they are. If a page needs a fourth level to make sense, a label or a link tends to do the job better.
5. Rearrange Without Starting Over
You can reorganise your documentation in Docmost without starting from scratch. Simply drag and drop pages in the sidebar to change their order or move them under other pages.
To move a page to another space, open its page menu and select Move. This moves the page along with its sub-pages to the new space. If you want to keep the original, select Copy to space instead.
For example, if another project team needs a deployment guide you've already created, you can copy it into your shared space so both teams can access it.
6. Name Pages So People Can Find Them
In Docmost, page titles show up in search results and when team members use @ mentions to link to other pages. Clear, descriptive titles make it easier to find the right document without opening several pages.
Try to use the same naming style across your project spaces to keep everything organised. Here are a few simple tips:
- Start with what the page is and follow with the subject, for instance, "Decision: Move launch to March" or "How to: Request staging access."
- Use the same pattern for dated pages and write the date year first, for example, "Meeting: Weekly sync 2026-11-04."
- In the shared space, name a page after the process instead of the project that first needed it, since other projects will use it too.
- Keep titles short enough to read in the sidebar without cutting them off.
7. Use Labels to Connect Pages Across Projects
A page tree gives each page one home, but some pages belong to more than one group, and labels cover that. Docmost labels organize and find related pages across spaces, so you can tag every decision page with ‘decision’, every retrospective with 'lessons-learned', and every page from the design stage with ‘design-phase’.
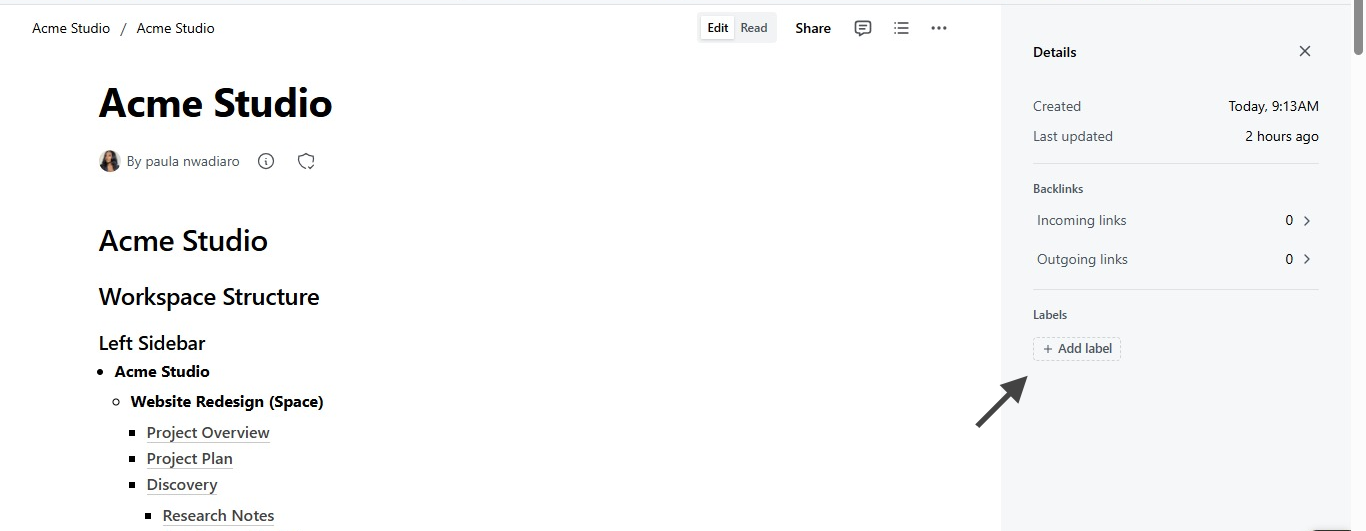
To add one, open the page, click the ⓘ icon to open the Details panel, and select Add label. Label names are lowercase, with spaces replaced by hyphens.
To find pages later, open Search, choose Filter > Labels, and select one or more labels. The results include pages with any of the labels you picked, and you only see pages you have access to. The Details panel also lists backlinks, which are the pages that link to the one you are reading. For more on linking pages, see this guide on how to link wiki pages together.
8. Keep Every Project Consistent with Templates or a Starter Space
Docmost has page templates that help teams create documents with a consistent structure. Available on Business and Enterprise plans, you can use them for meeting notes, project plans, onboarding checklists and other documents your team creates regularly.
To create a template, open Templates in the sidebar and select New template. Add a title and the content you want to reuse. You can make it available to everyone in your workspace or limit it to a specific space.
One thing to note: editing or deleting a template won't change pages you've already created from it.
If your plan doesn't include templates, you can use a starter space instead. Create a space with the pages and sub-pages your team needs, then use Copy to space whenever you start a new project.
This way, your team can reuse the same documentation structure without setting everything up from scratch.
9. Control Who Sees Each Project's Documentation
Docmost lets you control who can view or edit each project space. This is useful when different projects involve different team members, departments, contractors or clients.
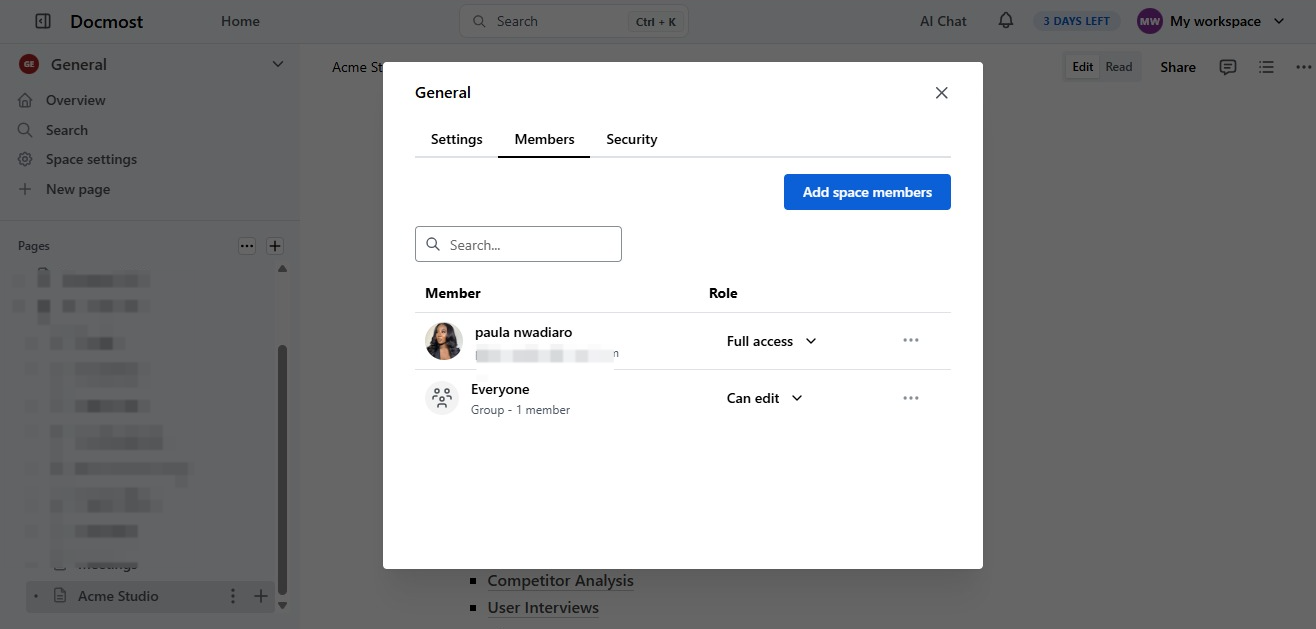
To manage access, open Space Settings, go to the Members tab and select Add Space Members. You can add individual users or groups and assign them a role: Full Access, Can Edit or Viewer.
You can also use groups to make things easier. Instead of adding people to each space individually, simply assign an existing group. If a contractor no longer needs access, you can update their group membership under Settings > Groups.
If you're on Docmost Business, you can also set permissions for individual pages. This means you can give someone access to a project space while restricting sensitive documents, such as budgets or internal assessments, to specific people.
If you host Docmost yourself, three things apply:
- Your data never leaves infrastructure you control.
- You define your own compliance posture (access controls, encryption, retention) instead of inheriting a vendor's.
- Hosting, backups, upgrades, and security patching become your IT team's responsibility.
Plan for that last point before you install, so the people who will own it know what it involves. For more on running project documentation on your own servers, see this guide on keeping project documentation beside your tracker in a self-hosted wiki.
10. Keep Project Pages From Going Out of Date
Assign someone to look after each important project document and set a schedule for reviewing it. This helps keep things like project requirements, technical documentation, onboarding guides and decision records up to date.
Docmost Enterprise has a page verification feature that lets you assign people to review pages and set one-time or recurring review dates. You can also request reviews, track approvals and mark pages as verified.
If your plan doesn't include this feature, you can add page owners and review dates directly to your documents. Then use a recurring calendar event or task to keep track of reviews. Just note that Docmost doesn't currently send automatic reminders for review dates.
For more guidance, see how to assign page owners and review dates in a wiki.
11. Track Changes to Project Documentation with Page History
Project documentation changes as work progresses. Requirements evolve, decisions change and plans get updated. Docmost automatically saves page history, so you can always go back and check earlier versions of a document.
To access it, open the page menu (three dots) and select Page history. You can view previous versions, compare them with the current page or restore an older version if needed.
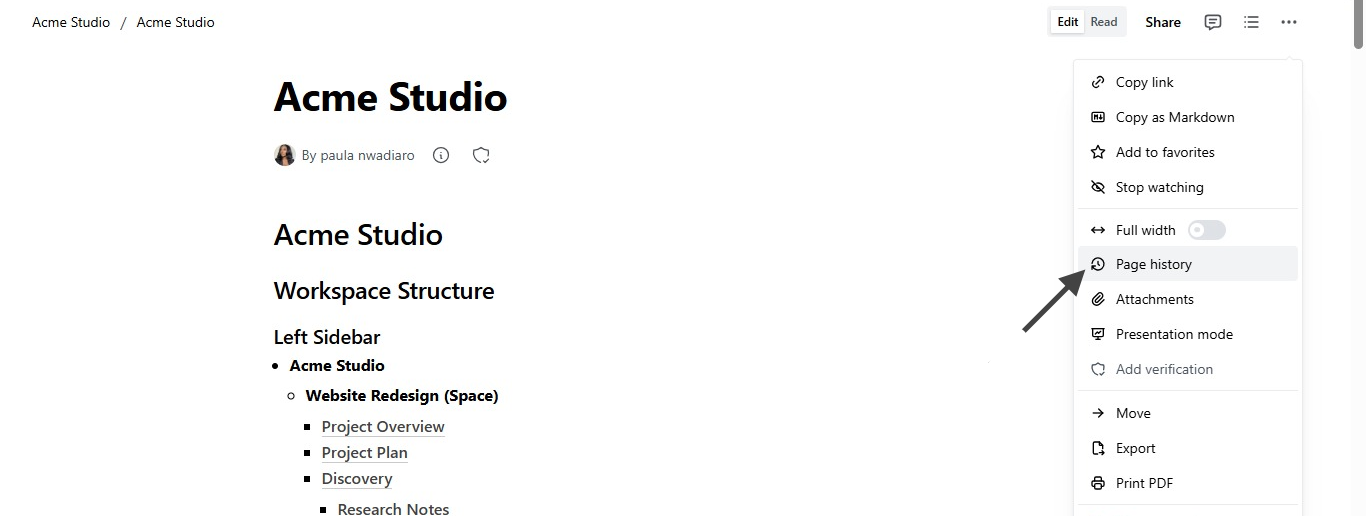
For example, if someone makes an incorrect change to a project plan, you can use page history to restore an earlier version.
12. Improve the Search Experience
As your project documentation grows, finding the right information can become harder. Docmost Search helps team members find pages without having to browse through every space.
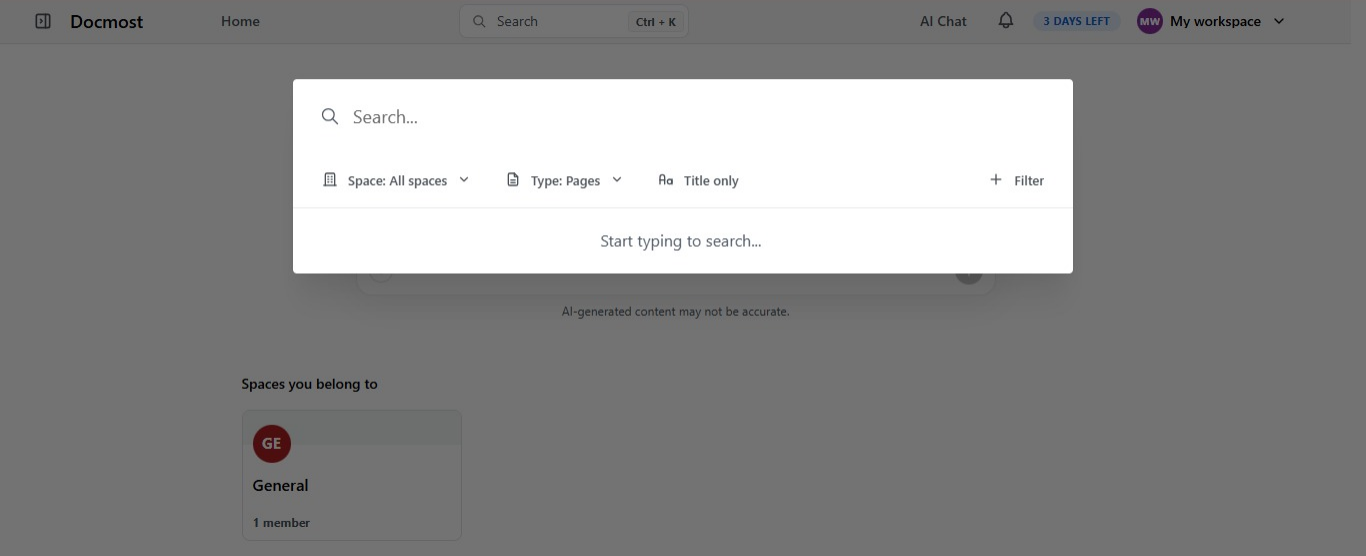
You can also filter search results by space, labels, creator and content type. You can even search for uploaded attachments to find supporting documents.
With Docmost Business, you can also search inside supported PDF and DOCX files. This means you can find information within uploaded documents without opening them one by one.
13. Archive Finished Projects Without Losing What They Taught You
When a project ends, review its documentation and decide which pages are still useful to other teams. You can move these pages to a shared Docmost space using the Move option. Any sub-pages will move with them, so you don't have to recreate the structure.
Keep project-specific documents in their original space. This gives your team a record of the project's work, decisions and outcomes.
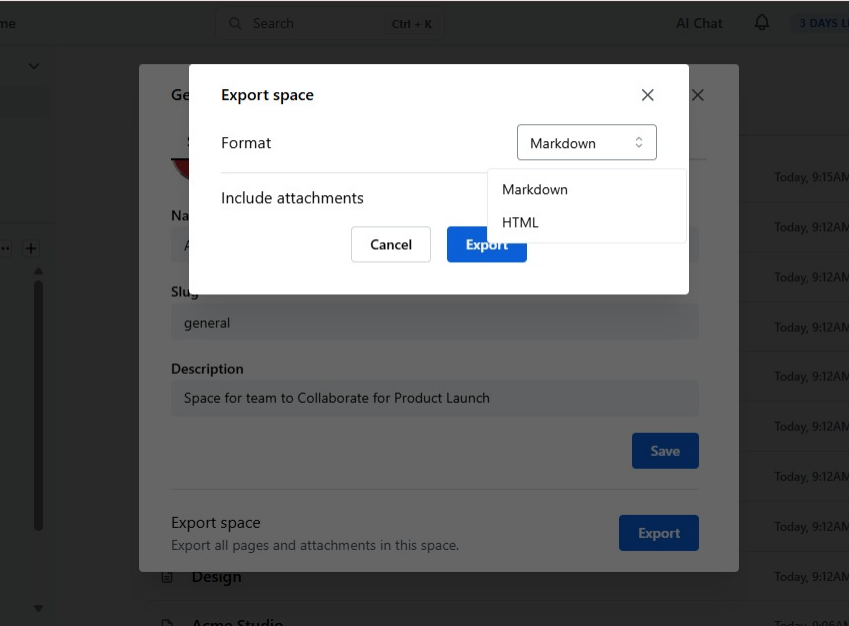
If you need an offline copy, you can also export the entire space. Go to Space Settings, open the Settings tab and select Export.
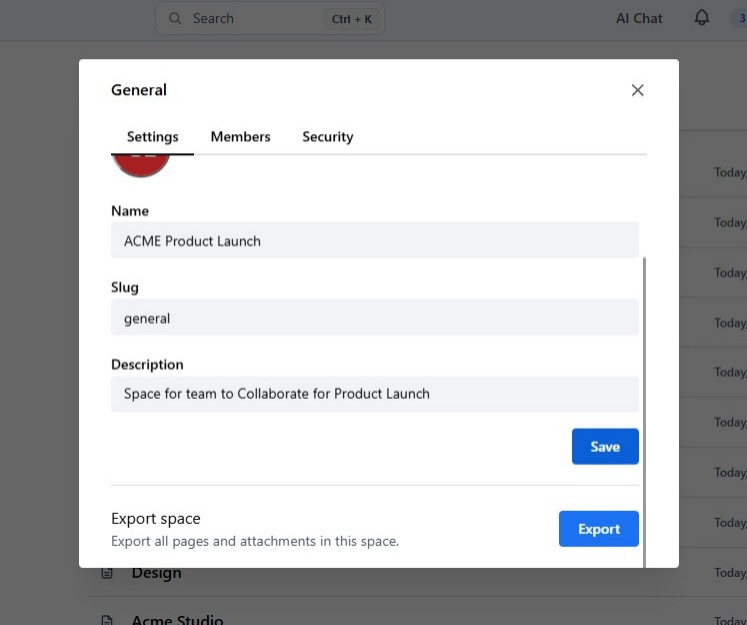
Choose Markdown or HTML and decide whether to include attachments. Docmost will package everything into a ZIP file for you.
For the rest of the wrap-up routine, see this guide on how to set up a project wiki for your team.
For more on moving content in and out of Docmost, see the import and export guide.
Frequently Asked Questions
- Should every project get its own space?
A separate space gives a project its own members, roles, and page tree, which keeps access and structure easy to follow. Small projects run by the same team can share a space if each gets its own top-level page, and you can move a project into its own space later.
- How many levels should a wiki page tree have?
About three. A space, a top-level page, and a sub-page are enough for most projects, and a fourth level is where people start losing their way. When a page seems to need more depth, a label or a link usually fits better.
- Can I share a project page with a client outside my team?
Yes. Open the page, click Share, and turn on sharing to generate a public link. You can choose whether to include the page's sub-pages and whether search engines can index it, and anyone with the link can view the page.
- Can I see what changed on a page and go back to an earlier version?
Yes, Docmost saves page history automatically as people edit. Open the page menu, click Page history, and select a version to see what changed compared with the current page. Click Restore to go back to it.
- Do I need folders to organize project documentation in a wiki?
No. In Docmost, a page with sub-pages does the job of a folder, so a page like Meetings can hold every set of meeting notes. Spaces keep the projects themselves apart.
- Can I search across all my projects at once?
Yes. Open search with Ctrl/Cmd + K and set the Space filter to All spaces. The search covers every space you have access to, so people only see results from projects they are members of.
Organize Your Project Documentation in Docmost
Keeping project documentation organised is much easier when every project follows a clear structure. With Docmost, you can create a separate space for each project, organise information with pages and sub-pages, and keep shared resources in one place.
Features like page templates, labels, permissions, page history and exports also make it easier to manage your documentation as projects progress.
Ready to give it a try? Get a free trial license to try it on your next project, or contact sales to see how it fits your team.